
Please note that this is a non-standard function that is not made available in all instances.
Membership Data Import - Getting Started
This guide is designed to take you through the step by step process of importing your Member’s data.
Step 1 - Generate MicrosoftTM ExcelTM Import Template
To generate an import template, go to Administration > Membership Data Import. Click Generate.
The importance of generating a new import template each time is that you may have altered information within the console, in particular your custom fields. Therefore by generating this template each time, you export out your most recent template.
The webpage will then prompt you to Open or Save the file. Open the File in Excel and save your file name with your Organisation Name and ‘Import’ in the Title. You should avoid using spaces, hyphens, full stops, or any other non-printable characters in the file name.
Remember to save the file somewhere in your computer where it will be easy to retrieve when editing and uploading the data.
Step 2 - Enter Data into Import Template
NOTE: This guide refers to Subscription Types and Member Types, however depending on the configuration of your system, this may be different. For example Member Type might be Age Groups and Subscriptions might refer to Registration Fees.
When entering data into the Import Template, no columns are to be removed from the import template. Enter in the required information into the appropriate fields.
Formatting Requirements
The following formatting requirements MUST be adhered to, to ensure the success of the import.
Member Types and Subscription Types
Every member should have a membership type code and a subscription code.
The Member Types and Subscription Types (Columns AE/AF) in the import template refer to the code for the relevant Member Type and Subscription Type that you would like assigned to each member. These fields are mandatory in the import template and can be found within your SportsTG Console.
Go to the menu Members/Member Type. Here all your member types will be shown.
Each type is given a unique code by the system, which can be seen on the right hand side of the title. This is the Member Type Code. Enter the correct code into the column AE of the import template for each of your members being imported.
To find the Subscription Types Code, go to the menu: Subscriptions/Subscription Types. The Codes for these Types will display in the column to the right of the Title.
Alternatively:
Click Here for instructions to create a Member Type
Click Here for instructions to create a Subscription Type
If no subscription code is required, in Subscriptions/Subscription Types, create a subscription type called N/A and use this code in the allocated field. The importance of having a subscription type code is this segments this from your other data. Membership type code will allow you to select the desired member type you wish to upload this file to, for instance member prospects. This therefore differentiates these members from the rest of your database.
Date of Birth and Other Date Columns
The date of birth field (Column V), and any other date field, should have dates entered as ( YYYY-MMM-DD ) . When the template entry has been completed, right click with your mouse on the relevant column to highlight it, and open the column menu. Go to the menu option FORMAT CELLS, then NUMBER tab, select the date option from the category box, and then the dd-mmm-yy (ie. 14-Mar-01) formatting option.
This will ensure that day and month dates remain consistent when the data is imported.
Gender
The gender column must be completed with either a numeric 1 or 2 to represent males and females respectively. (ie. 1 = Males, 2 = Females.)
Yes/No questions format
Yes and no questions must be completed with either a numeric 1 or 2. 1= YES and 0=NO
Checking Data
Please ensure the following checklist has been completed:
- If there is no data in a cell in the first column of the spreadsheet, insert a full stop into these cells.
- Ensure that there are no commas.
Once data entry is finished, save your File.
If you see a warning about the destination file type not supporting multiple sheets, just click OK.
Note: You must call SportsTG on 03 9426 2600 for authorization to load a list larger than 5,000 entries. Any list over that size will get truncated to 5,000.
Step 3 - Upload Data Spreadsheet into system.
Once the file is saved now proceed back to the console and back into Administration/Membership Data Import, select the Data Upload menu option and browse to find the file you just created. Select the file and press Upload File.
Once this has been completed a list of the records you have created will appear. Members that are highlighted in yellow have been flagged as member's already appearing in your membership database.
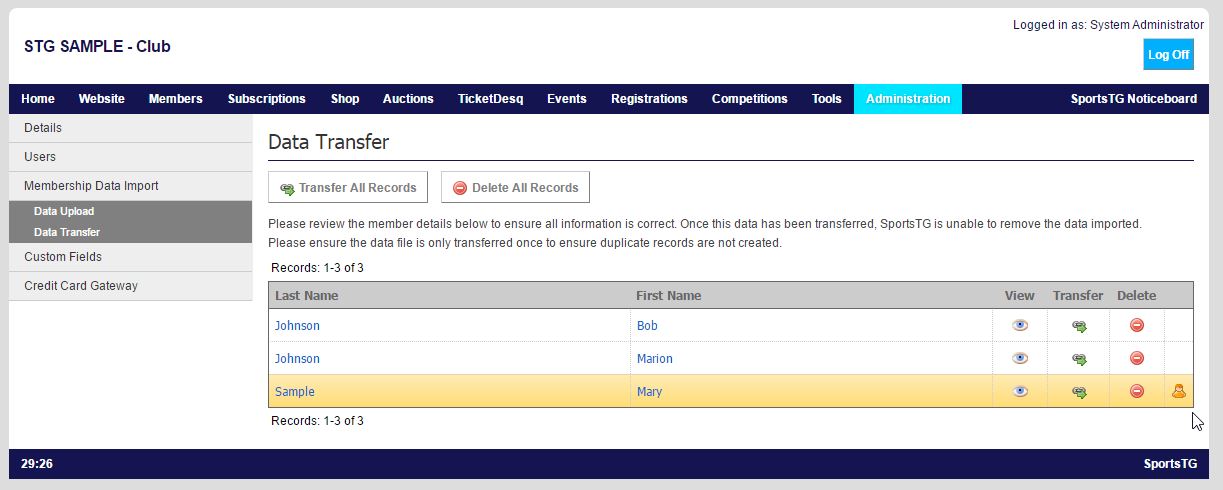
Duplicate are flagged base on the Duplication Verification settings in Members > Options.
Any duplicate members that administrators do not wish to import, can be deleted, by using the Delete icon next to the member name. If left, the member will be transferred.
It is advised that you spot check a few members to ensure the data has imported correctly. This can be done by clicking on the View icon next to the Member’s name. Ensure that the MEMBER TYPE CODE and SUBSCRIPTION TYPE CODE have imported correctly, as well as check dates and genders to ensure the correct formatting was used in the template. This should be repeated for a spread of the Members (around five to ten).
If the import template was not completed correctly, click the Delete All button to delete the records, modify the import template and repeat the upload again.
If all is correct select Transfer All, this will transfer all the records into the membership database.